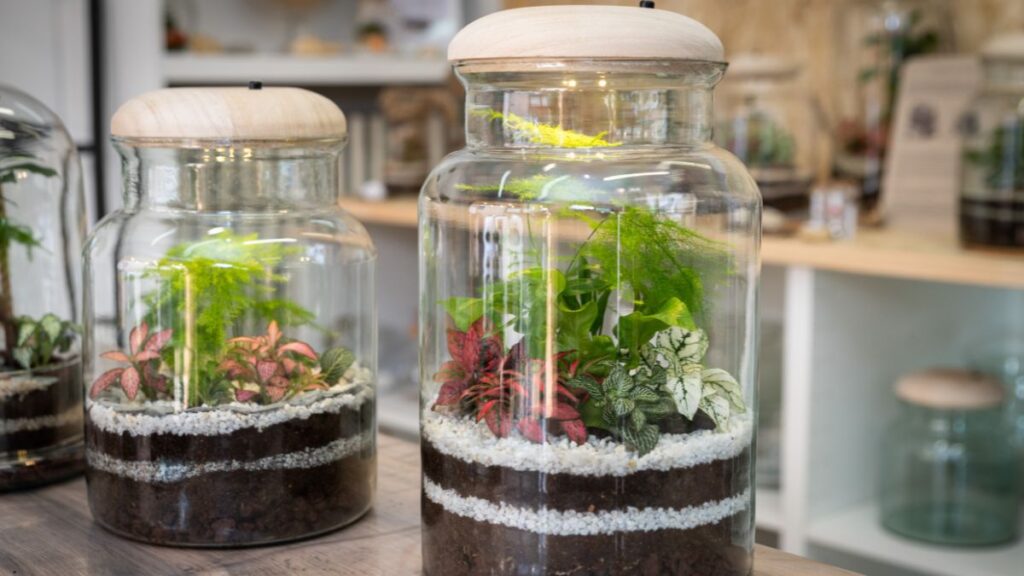
Picking up a glass jar and arranging soil or stones inside feels like building a tiny, living world one layer at a time. Digging into terrarium layering techniques reveals how patterned soils, pebbles, and mosses together shape vibrant micro terrarium ecosystems.
If you want a terrarium that catches the eye from every angle, structure matters just as much as plant choice. Layering influences depth, drainage, and the lush, natural look that sets these mini gardens apart from regular pots or planters.
This article shares specific terrarium layering techniques you can use today to achieve eye-popping depth, tactile textures, and living visual appeal. Let’s break down the process and the creative moves to raise your micro terrarium’s natural artistry.
Choosing the Right Base: Laying the Foundation for Lasting Depth
Selecting a solid foundational layer sets your micro terrarium up for both longevity and drama. The first barrier manages water flow, shapes the terrain, and frames every visual layer you build above it.
Your first layer is your drainage. Avoiding soil at the bottom prevents root rot and swampy smells—an invisible fix with a huge visual and structural impact.
Pairing Substrate Types for a Balanced Foundation
Start by pouring in cleaned pea gravel, aquarium stones, or chunky perlite—enough to keep roots clear of sitting water. Swirl the jar so the material slopes up one side for a hillside effect.
Above gravel, add a thin layer of activated charcoal. This absorbent barrier neutralizes odors and filters water, ensuring healthy airflow in your micro ecosystem.
Combining these creates a layered look when viewed from the side and keeps your terrarium fresh and functional for months.
Visual Depth and the Art of Sloping Layers
Bury one side of the stones deeper than the other. This slope gives the illusion of rolling land or a riverbed, even in a small vessel.
Use a spoon to smooth gravel into bumpy hills or carve out valleys. Picture a mountain scene instead of a flat playground—this sets the stage for dramatic layering above.
Imagine the perspective effect of paths in nature: tilting the first layer keeps each section visually distinct, not mashed together, so every plant and rock pops.
| Layer | Material | Main Function | Key Takeaway |
|---|---|---|---|
| Base Drainage | Gravel, Stones, Perlite | Prevents root rot by keeping water away from plant roots | Always add drainage as the first step |
| Odor Barrier | Activated Charcoal | Filters toxins, keeps air fresh | Thin layer improves long-term health |
| Soil | Terra Cotta Soil, Moss Mix | Plant rooting medium, provides nutrients | Pile at an angle for depth illusion |
| Decorative Top Layer | Moss, Pebbles, Bark | Adds tactile texture and realism | Mix textures for natural variety |
| Focal Elements | Mini Rocks, Wood, Statues | Creates focal points and visual breaks | Place strategically to guide the eye |
Building Up Texture: Contrasts, Patterns, and Tactile Surfaces
Layering distinct materials in stages makes each micro terrarium ecosystem come alive. Use sharp contrast for drama or soft blends for tranquility—either approach beats monotone designs.
Padding the soil with rough bark, coarse sand, and velvet moss brings a touchable, multi-textured surface to even the tiniest glass vessel.
Mixing Elements for Maximum Impact
Combine smooth and jagged stones for the rocky feel of a mountain stream bank. Pepper in clumps of reindeer moss for gentle, cloud-soft mounds alongside crunchy gravel paths.
- Spread accent moss to cover bare patches. This anchors the scene, softens transitions, and provides a vivid green highlight between rocks.
- Add wood chips or bark strips along the edge to mimic forest floor debris. These fragments reinforce the illusion of scale and offer texture.
- Pile course grit or aquarium sand in bands to sketch out pretend walkways or riverbeds. It guides the gaze naturally through your scene.
- Insert several pebble colors at different heights to create depth. Varying tones trick the eye into seeing shadow and distance.
- Nestle air plants or tiny Tillandsias into nooks. Their wiry shapes break straight lines and give instant character to layered arrangements.
These terrarium layering techniques make even plain jars interactive and inviting—guests will catch themselves reaching in to feel.
Achieving Color Harmony with Natural Materials
Choose a mix with no more than two dominant colors: rich browns plus soft greens, or gray rocks beside tawny mosses. Too much variety looks messy in small spaces.
- Pick one accent color for visual punch, such as golden lichen or red jasper chips.
- Use drifts of the same colored sand to echo natural geography, like a desert path winding through rocks.
- Limit bright additives to one cluster per terrarium for an intentional, not random, look.
- Cluster similar colors together for a mood: earth tones for coziness, cool tones for calm.
- Use contrasting shades to outline layer changes, making each plateau distinct and increasing overall depth.
Restrained palettes help your terrarium layering techniques showcase textures instead of overwhelming the eye. Color becomes another tool for guiding attention.
Shaping Terrain for Natural-Looking Elevation
Sculpting your substrate and soil lets you shape ridges, hollows, and level changes, building a dramatic natural landscape within your micro terrarium ecosystem. Create terrain features as you would in a bonsai dish or a landscape model.
Tilting and shaping lets you incorporate realistic slopes, hidden valleys, or gentle rises that echo outdoor scenery but fit in a palm-sized jar.
Creating Hillsides and Valleys
Use a teaspoon to heap more substrate on one side. Then, press gently to anchor it without compacting. Leave dips or hollows for a miniature riverbed or fern patch.
Imagine a battered mountain crest—or valley carved by water—and mimic that form. Sloping techniques make plant roots grow naturally, following the land’s tilt, just as in nature.
A toothpick or narrow spatula can dig channels for pretend streams or create curved banks for a winding mossy path, enhancing both realism and water movement.
Banks, Boulders, and Mini Cliff Faces
Add clusters of chunky gravel or small pebbles along one edge to suggest a cliff face or rocky shoreline. Secure with a pinch of moist soil to prevent rolling.
Build tiers: stack thin bark sheets or flat stones to look like horizontal shelving. Use these as natural steps, with moss trailing down like a waterfall.
Hide the transition between soil and rock with tufts of moss or air plants, blending the elements and disguising harsh edges. This trick ups the wild effect.
Plant Positioning: Arranging Micro Scenes for Visual Flow
Laying out plants by height, color, and surface texture maximizes the sense of depth in any micro terrarium ecosystem. Your arrangement should move the eye along a deliberate path, never just random scatter.
Use terrarium layering techniques to separate foreground, midground, and background, so every plant gets a distinct place in the tiny landscape.
Staging Focal Plants for Maximum Depth
Position your tallest or boldest plant slightly off-center, not dead in the middle. This trick creates a leading line, guiding attention toward a primary focal point.
Add low, spreading mosses in the foreground. Let these crawl up any slope you’ve sculpted, blending into the soil and softening the horizon line.
Place accent plants—like nerve plants or baby ferns—near dips or corners. These draw viewers deeper into little “valleys,” revealing surprise details at every turn.
Spacing and Layering for Growth and Balance
Leave room for each plant to grow by keeping roots separate and giving fronds space to spread. This spacing preserves distinct layers as plants fill in over time.
Cluster three or five similar plants at slightly different heights to echo nature’s tendency toward odd, asymmetrical groupings.
Tuck air plants or lichens along ridgelines and rocky ledges to break up empty areas and add texture without overwhelming delicate ferns or mosses.
Capturing Light and Shadow: Using Layering to Shape Visual Drama
Terrarium layering techniques can create dynamic lighting effects, making each micro terrarium ecosystem visually active throughout the day. By considering light angles and shadow-casting elements, you add dimension.
Strategically placed rocks, moss, and upright plants cast delicate shadows on lower layers, giving the illusion of changing daylight or breeze even in a static glass jar.
Maximizing Highlights on Focal Points
When placing your most striking element—like a quartz crystal chunk or showy fern—aim for the spot with the most consistent indirect light. Watch as highlights appear whenever you rotate or reposition your terrarium.
Surround the primary highlight with lower, darker moss for contrast. This spotlight effect draws the eye and makes the micro scene feel alive at a glance.
If sunlight moves through the day, rotate the vessel every week to shift shadow direction, keeping the tiny landscape feeling fresh and ever-changing.
Shadows, Texture, and Microclimates
Shadows under chunky bark or pebbles create miniature shade pockets. Place moss or humidity-loving ferns in these cool zones, as they’ll thrive with a touch more protection.
In drier zones—on the highest, most exposed ridges—position tougher desert moss or smaller gravel. Reimagine these areas as mini deserts alongside lush valleys.
These microclimate tricks ensure different plants thrive in the same terrarium, letting you use advanced terrarium layering techniques for both beauty and health.
Adding Focal Points and Decorative Accents
Thoughtfully placed props or ornamental elements turn your micro terrarium ecosystem from a beautiful dish garden into a compelling scene. When you use terrarium layering techniques, treat each prop as you would a miniature sculpture or garden ornament.
Props come alive when half-buried or nestled beside a boulder, never floating aimlessly or plopped on the surface. Give every accent a reason to exist within the layered world you’ve built.
Placing Ornaments for Storytelling
Set a tiny bench or cottage on a knoll, just above a mossy “path.” Someone might imagine sitting there watching miniature wildlife scuttle by, or picture rain collecting at the valley base.
Angle a driftwood piece across a gravel “creek” to form a bridge. Paired with tiny stones, this detail makes the landscape believable and interactive, not toy-like.
If you use resin figurines or glass animals, cluster them with living elements. Half-hide a frog in moss or let a snail peek from behind bark for realism and whimsy together.
Balancing Realism and Imagination
Stick to a theme for each accent to keep your world cohesive. A forest needs mushrooms, while a rocky desert suits crystal points. Refer to natural counterparts when in doubt.
Use natural materials where possible. Even a carefully placed pebble or minuscule pine cone tells a more convincing story than plastic props scattered everywhere.
Choose accents that tell a story without overloading the vessel. Let empty space serve as a canvas for the imagination—sometimes, less truly is more, even with ambitious terrarium layering techniques.
Maintaining Structure: Pruning, Cleaning, and Reshaping Your Layers
Keeping a micro terrarium ecosystem looking its best means routinely cleaning, pruning, and reshaping every layer you’ve created. Attention to detail keeps depth, texture, and health in balance for the long term.
Plan regular checkups. You’ll notice errant roots, stray moss, or shed leaves, and can intervene before small messes grow into tangled chaos.
- Trim back plants each month: Remove yellowed leaves, moss overgrowth, and encroaching roots. This preserves your layering, stops rot, and leaves every element visible.
- Use tweezers to reposition gravel and bark: Realign any stones that have tumbled or exposed soil, keeping each layer distinct and landscape-style terrain intact.
- Spot-clean with a soft brush or compressed air: Sweep dust from moss and leaf surfaces for sparkling clean contours that keep details crisp and photogenic.
- Refresh charcoal and tidy base layers every season: Replace charcoal when it loses potency and top up gravel as it settles, so your drainage system keeps working.
- Watch for fungus or pests: Remove affected debris quickly so plant health and visual impact both stay at their peak in your terrarium layering techniques journey.
Alert, regular care makes sure your original vision continues to shine, from drainage base up to decorative accents and focal plants.
Frequently Asked Questions
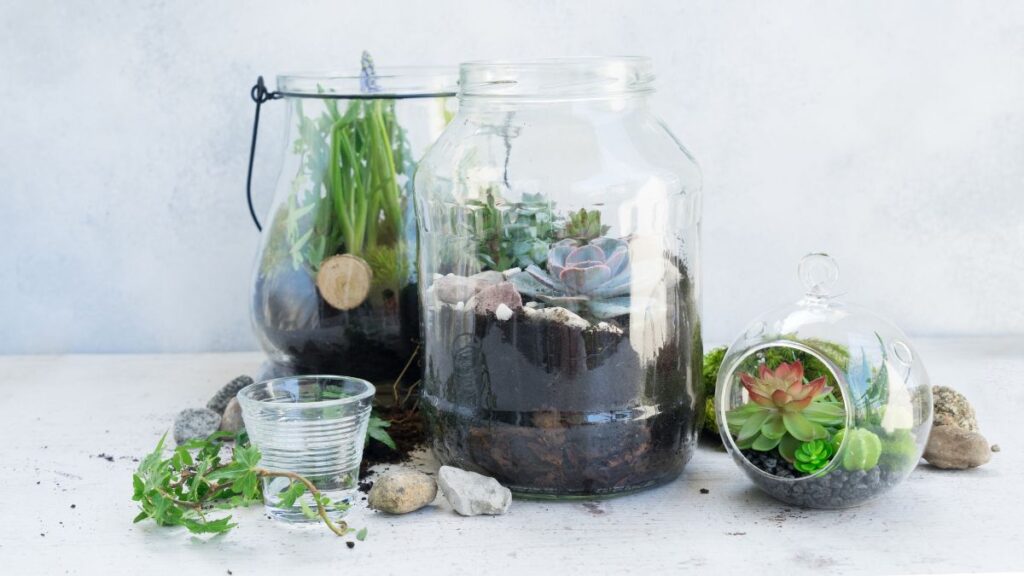
What is a micro terrarium ecosystem and why choose one?
A micro terrarium ecosystem is a miniature, self-sustaining plant community within a small glass vessel. People love them for their beauty, low maintenance, and the calming effect of creating and observing tiny natural scenes.
How many layers are essential in terrarium layering techniques?
A well-built micro terrarium ecosystem should have at least four layers: drainage (gravel), charcoal, soil, and a decorative top layer. Adding more—like bark, sand, or moss—boosts depth and texture while improving structure and plant health.
What are common mistakes in layering techniques?
Overcompacting substrate, skipping charcoal, using too much water, or going overboard on decorations can cause issues. Aim for a clear layering order and limit props so plants always remain the star features.
How do I prevent mold or rot in my terrarium layers?
Use activated charcoal in the base, avoid excess watering, and ensure good airflow (open the lid periodically). Quick removal of wilted parts and regular layer maintenance further prevents fungal growth and moisture issues.
Can I use colored sand or stones in a micro terrarium ecosystem?
Absolutely! Colored sand and stones can highlight distinct layers, pathways, or focal areas—but use them sparingly. Too many bold colors may make a small vessel look busy, so blend with natural tones for best results.