A countertop bursting with green micro herbs can spark curiosity and delight in any kitchen. Seeing those vivid leaves thrive indoors gives a unique satisfaction, especially when nurturing them feels truly hands-on.
People seek fresh, homegrown ingredients for flavor, nutrition, and visual appeal. Micro herbs answer this need, offering intense tastes and healthy microgreens without the challenges of outdoor gardening.
This guide reveals how anyone—with a few practical steps—can succeed at growing micro herbs year-round, keeping miniature terrarium ecosystems lush regardless of the season outside.
Creating the Right Environment for Micro Herb Growth
To see vibrant micro herbs sprouting indoors, start with a terrarium ecosystem that delivers balanced light, consistent moisture, and great airflow. This step is the foundation for results you can measure and taste.
Choose a transparent container so your micro herbs get gentle, indirect sunlight for steady photosynthesis. A lidded glass vessel or open bowl works, but each demands a slightly different watering rhythm to avoid excess moisture or dryness.
Lighting Choices Make a Noticeable Difference
Placing micro herbs near a bright east-facing window helps most varieties stay compact and brilliant green. Supplemental LED grow lights can take over when natural daylight isn’t reliable.
A basic timer encourages daily consistency—set it for 12 hours of light during winter to mimic spring. If leaves start stretching toward the glass, move the light source a bit closer for stronger growth.
Watch for pale color or floppy stems. These cues tell you when to increase brightness, just like a plant leaning toward the sun outdoors.
Balancing Humidity and Air Circulation
Micro herbs thrive when the air feels fresh, not stagnant. Crack the lid on a glass terrarium or set up a gentle desktop fan to keep new shoots strong.
If condensation builds up inside the glass, wipe it away and air out the container for half an hour daily. Balanced air keeps micro herbs crisp and prevents mold issues from taking root.
As a rule: if you can see your breath in the terrarium, it’s time to ventilate. Dry the rim with a cloth and let the ecosystem reset itself.
| Terrarium Type | Humidity Level | Light Requirement | Takeaway |
|---|---|---|---|
| Closed glass jar | High, 70–90% | Indirect, filtered | Crack lid daily, low-maintenance with proper airflow |
| Open bowl | Moderate, 40–60% | Bright, direct or indirect | Water more frequently, monitor drying |
| Plastic cloche | Adjustable, 60–80% | Bright, indirect | Lift for air, retains warmth |
| Fish tank | Steady, 60–70% | Sunny spot or controlled LED | Great for experimenting, use pebbles for drainage |
| Mini greenhouse | Variable, up to 85% | Supplemental or window | Check seals and adjust vents |
Picking Micro Herb Varieties for Reliable Results
The journey to flavorful micro herbs starts with thoughtful variety selection—some choices sprout faster, while others hold their taste or color longer. Reading seed packets helps pinpoint consistent options.
Flavor, color, and ease of harvesting depend on the type you grow. Choose based on your kitchen habits or what looks visually appealing in your miniature terrarium ecosystem.
Choosing High-Performance Micro Herb Seeds
“I want basil that’s reliable on pasta night.” That’s a realistic intention. Look for ‘micro’ or ‘petite leaf’ on seed labels, and check for rapid sprouting claims.
- Select radish micro herbs for a quick peppery punch; sow seeds every week to keep your harvest coming.
- Grow cilantro micro herbs for taco toppings; their delicate leaves refresh recipes if harvested young.
- Add purple basil micro herbs for color contrast; they turn simple salads into art, especially when paired with tomatoes.
- Plant micro celery for subtle crunch; the lacy, small leaves last and brighten up soups.
- Try shiso micro herbs in sushis or garnish platters—they carry bold flavor in compact form, thriving in moist terrariums.
Each choice gives your kitchen routine a predictable upgrade, letting you season or decorate dishes on demand.
Ensuring Long-Term Satisfaction with Succession Planting
Succession planting guarantees there’s always a fresh batch of micro herbs ready to clip. Stagger sowing every few days using small surfaces in your terrarium ecosystem.
- Start with one batch of seeds; cover lightly with soil for faster germination.
- Three days later, set a new tray alongside. Mark the date using a sticky note on the glass.
- As the first tray approaches harvest height, sow another, so there’s always a rotation maturing.
- Water each batch consistently but avoid drenching, keeping tiny roots healthy and rot-free.
- Harvest from the oldest tray first, snipping leaves just above soil level for quick regrowth.
This cycle supports a continual supply, and the visual difference lets you track growth success at a glance.
Setting Up Your Micro Herb Terrarium Ecosystem for Beginners
Anyone setting up a micro herb terrarium ecosystem can see real success by organizing tools and supplies before planting. This section walks through an easy, proven sequence for prepping your indoor garden.
A clear workspace ensures seeds, tools, and soil don’t go missing. Think of your table as a chef’s station, with each item laid out in order of use for a stress-free process.
Gathering Materials: A Step-by-Step Guide
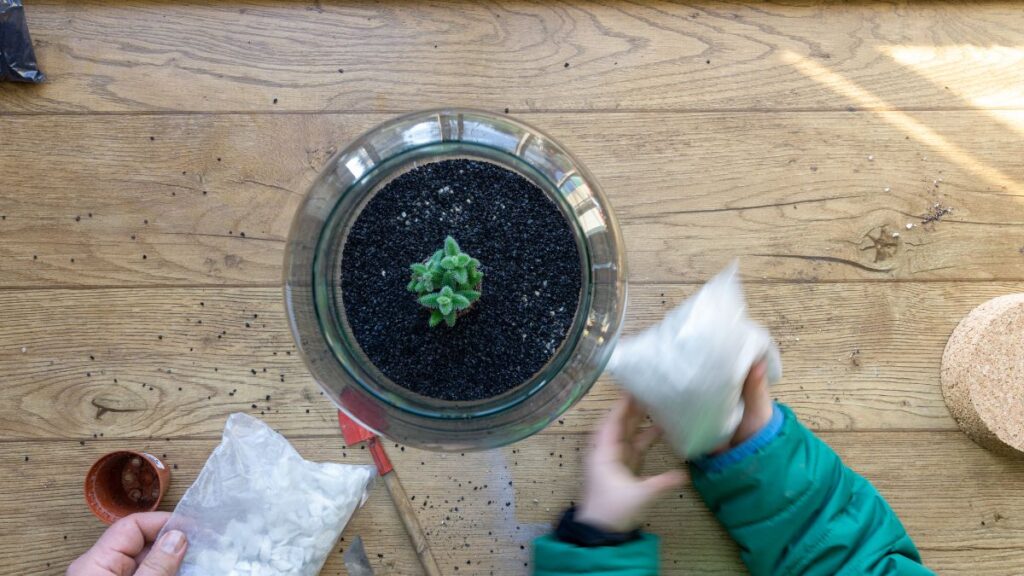
Start by washing your chosen terrarium or bowl with hot, soapy water and drying it thoroughly—this step prevents fungus and pests later. Assemble clean scissors, a small watering can, and seed packets within reach.
Next, pour a shallow layer of pebbles at the bottom for drainage. Add moistened seed-starting mix above the stones, pressing gently for an even, level surface that encourages even sprouting and minimal mold.
Shake micro herb seeds across the surface; a pinch between thumb and finger scatters them without clumping. Mist lightly, then cover with a thin sheet of clear plastic wrap to lock in humidity until the first sprouts appear.
Planning for Growth: Organizing Space
Space seeds evenly, about a finger-width apart, so each micro herb receives air and light. Analogous to arranging cookies on a baking sheet, avoid overcrowding—this gives each leaf a chance to shine.
Label every tray or container. You might write “basil, 6/10” directly on the glass, providing reminders to track what’s sprouting and when to expect measurable growth.
If you’re managing multiple micro herb types, stagger their placement for easy access to the fastest growers up front. Regularly rotate containers for even exposure as the leaves seek light.
Watering and Feeding for Strong Indoor Growth
Watering and feeding routines determine how well your micro herbs mature inside their terrarium home. Correct timing delivers lush, flavorful harvests without the frustration of stunted leaves or yellowing stems.
A fingertip pressed gently into the soil surface tells you if watering is required. The top half-inch should feel moist (not wet) for most micro herbs to thrive.
Consistent Watering That Supports Healthy Growth
Use a spray bottle to mist micro herbs lightly once or twice per day. For closed terrariums, monitor condensation: small droplets inside the glass indicate it’s time to air things out.
If leaves wilt or look limp, water using a watering can fitted with a fine spout, aiming at the roots. Always let excess water drain away so roots won’t sit in soggy soil.
Repeat the process every day, adjusting the schedule if your indoor climate changes. Mark routine times on a wall calendar or phone alarm to build a reliable habit.
Adding Fertilizer Mindfully
Micro herbs don’t need much fertilizer due to their short lifecycle, but a once-weekly diluted liquid feed helps maintain leaf color and flavor after the first harvest.
Dilute all-purpose fertilizer to one-quarter strength. Pour over the soil, never the leaves—this prevents spotting or burn. Always water beforehand so nutrients absorb evenly, and growth remains balanced.
Watch the rate of leaf development as a cue for feeding routine: slow changes or dull colors mean it’s time for a small nutrient boost.
Harvesting Micro Herbs and Maintaining Your Indoor Oasis
Sun-ripened, crisp micro herbs turn every meal into a celebration. Harvesting and ongoing care keep your mini terrarium ecosystem productive while ensuring new growth emerges week after week.
Use clean scissors to snip micro herbs above their base when they reach 2 inches—this encourages regrowth and stops delicate stems from tangling or matting together.
Correct Harvesting Keeps Ecosystems Thriving
Leftover leaves or missed harvest days can stunt future crops. Every time you notice a tray is ready, cut above the seed line and gently lift out the crop for your next dish.
For slow growers (like parsley micro herbs), trim just a few leaves at a time. This helps the root base stay stable and makes it easy to fill in bare spots with new seeds whenever space clears.
Avoid ripping or pulling; sharp scissors give a clean cut, like trimming hair to prevent split ends. Discard spent roots and compost old soil every few weeks for a healthy ecosystem.
Rotating Crops and Refreshing the Miniature Ecosystem
After several harvests, some soil becomes compacted or depleted. Refresh by adding a thin layer of new seed-starting mix—or swap trays completely for a clean surface to begin anew.
Rotate successful varieties toward the front of your display and re-seed any gaps as you notice them. This approach prevents you from running out of your favorite micro herbs when you want them most.
If you spot yellow or stunted patches, scoop out the affected area and replace with fresh mix. This step protects the entire ecosystem and keeps your micro herb showcase looking lush all season.
Expanding Your Indoor Experience With Micro Herbs
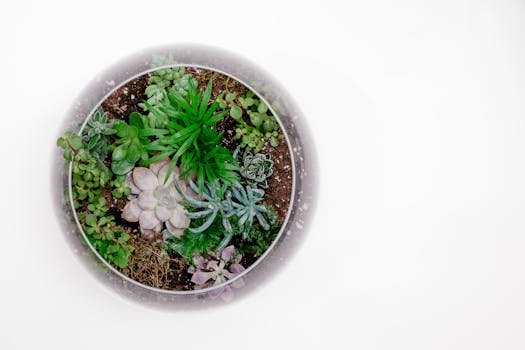
As micro herbs settle in, get creative with your miniature terrarium displays. Try combining leafy greens with edible flowers or striking mosses for layered visual appeal, making your setup a conversation starter.
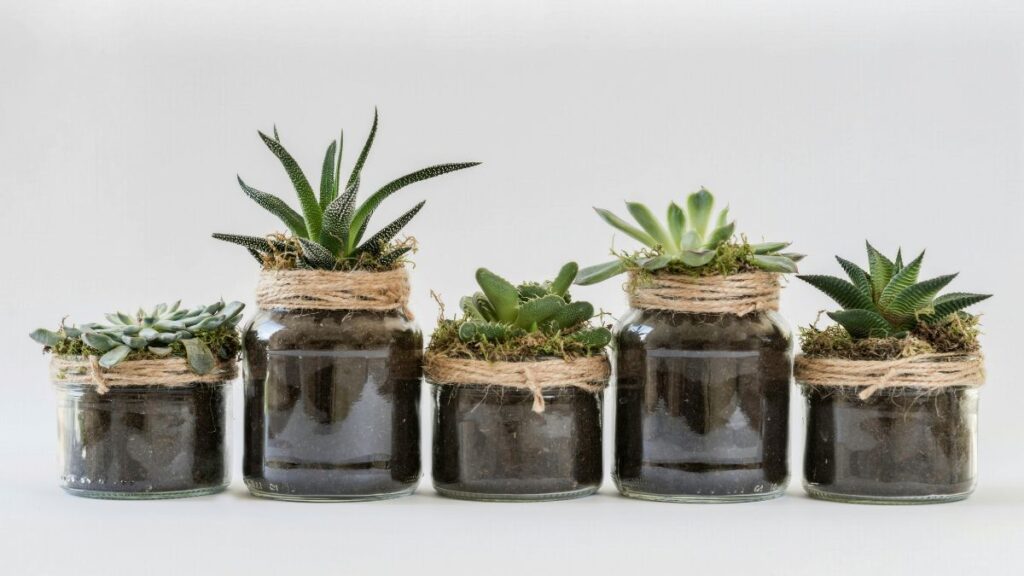
Switch up your routine by growing micro herbs in themed containers—teacups, glass jars, or shaped bowls add character and purpose. Kids and guests alike love seeing the surprise of tiny gardens on a dinner table.
Integrating Micro Herbs With Decorative Moss and Stones
Begin by pressing a patch of live moss between micro herb rows. The moss holds soil firmly, locks in moisture, and mimics the natural shape of a forest floor, keeping roots healthy beneath the surface.
Accent with polished pebbles in swirling patterns to guide water runoff and frame your crops, enhancing their appearance. This strategy blends beauty and function in ways any beginner can achieve.
Match your color scheme by choosing moss with bright green or gold tints, making the entire ecosystem shine under indoor light. Unique arrangements encourage daily check-ins and inspire regular maintenance.
Showcasing Micro Herbs in Snacking Stations
Arrange micro herb terrariums where people naturally gather, like kitchen counters or coffee tables, inviting impromptu harvesting. “Snip your own garnish for this sandwich,” a host might suggest, turning a meal into a shared experience.
Supply each station with child-safe scissors and mini tongs for snipping just what’s needed. This method reduces food waste and encourages everyone to experiment with fresh, living flavors.
Label different varieties with fun tags so even newcomers can distinguish basil from radish, boosting confidence and curiosity. Over time, the snacking station grows into a highlight of your home’s edible landscape.
Maintaining Momentum: Troubleshooting and Adapting
New and seasoned growers face challenges when maintaining micro herbs—yellow leaves, mold, or slow sprouting happen to everyone. Knowing which steps to take next saves your mini terrarium from disappointment.
Regular observation is your main tool. Scan leaves and soil daily for color, texture, and scent changes. This vigilance leads to small fixes before issues escalate.
Responding to Common Problems
If mold appears, remove it with a clean spoon and add sand or pebbles to open up the soil. Decrease humidity by airing the terrarium a few times each day—fewer fogged-up walls mean fewer fungal outbreaks.
Pale or lanky micro herbs may need more direct light; move your setup closer to a window or adjust your artificial lamp height. If stems feel soft, reduce watering frequency and let the top layer of soil dry slightly between sessions.
For leaves that brown at the tips, check fertilizer concentrations—flush the soil with plain water, then resume gentle feeding after a week. Visible improvement within days shows successful intervention.
Adapting Your Setup as Skills Grow
Try novel varieties like amaranth or lemon balm micro herbs as your confidence builds. Experiment with unconventional containers—Old spice jars, egg cartons, or ceramic mugs all work and add interest.
Collaborate with family, inviting kids to choose seeds or design terrarium themes. This engagement helps everyone feel invested in the results and turns troubleshooting into a fun, shared project.
Document your setups with photos and notes, tracking success stories and setbacks. Refer to this record before trying new arrangements, making the learning curve smoother season after season.
Reaping the Rewards: Lasting Enjoyment From Micro Herbs Indoors
Seeing thriving micro herbs in your terrarium brings practical rewards—fresh home-grown flavor, steady harvests, and a daily reminder of the beauty simple efforts create. Anyone dedicated to steady routines can turn these tiny plants into a year-long resource.
Your mini terrarium ecosystem shifts with the seasons, yet micro herbs reset with every new batch. This cycle motivates repeat efforts, building gardening skills in small, manageable steps.
Let your creative displays and healthy snacks showcase the habits you’ve invested in. Every miniature harvest is a gentle nudge to keep learning and enjoy the green spaces you nurture inside.
Frequently Asked Questions
How long do micro herbs take to grow in a terrarium?
Most micro herbs are ready to harvest within 7 to 14 days from sowing. Their rapid growth in controlled environments means you can plan chef’s garnishes or snacks in just two weeks, regardless of outdoor seasons.
Which micro herbs are easiest for beginners?
Radish and mustard micro herbs germinate reliably and show visible growth quickly. These varieties develop sturdy, flavorful leaves even if light or watering isn’t perfect, providing great early success and motivation to experiment further.
Can I reuse terrarium soil for new batches?
You can reuse soil a couple of times, but performance drops over repeat plantings as nutrients deplete. Refresh the top layer or swap out the soil every few harvests for best results and reduced risk of mold or pests.
What should I do if I notice mold forming?
Remove visible mold with a spoon, increase ventilation by leaving the lid off for short periods, and sprinkle coarse sand on the soil surface. Monitor humidity levels and avoid overwatering to discourage new mold from appearing.
Do micro herbs need fertilizer in miniature terrariums?
Light feeding helps after the first harvest if you continue growing in the same soil. Use a diluted fertilizer, applied weekly, to maintain leaf color and flavor. Skip feeding for very young greens or when starting fresh batches.