Lining up pebbles to mimic winding forest trails inspires the sense of storytelling that a scenic terrarium invites. Each pathway, no matter how small, steers the eye through a living landscape. The promise of crossing a diminutive bridge feels like entering a fairytale world, even when your ecosystem fits in the palm of your hand.
Exploring micro terrarium ecosystems brings up creative challenges—especially crafting pathways and bridges that look natural and proportionate. Thoughtful framing transforms a scenic terrarium from a jumble into a cohesive miniature scene. Strong design choices make these features feel deliberate and enchanting.
Through the following sections, discover actionable ways to build tiny trails and bridges that elevate any micro terrarium. Each step will help shape spaces that spark joy and invite the gaze to linger. Let’s immerse ourselves in the magic of scenic terrarium design at a miniature scale.
Building Realism with Proportion and Perspective
First, getting proportions right anchors realism; using well-chosen materials for tiny bridges and paths achieves the scenic terrarium feel immediately. A well-placed feature never looks toy-like or accidental.
In micro terrarium ecosystems, visual scale makes all the difference. If a stone steps path looks too large, it distracts from rather than adds to a natural scene. Commit to authentic scaling.
Visual Shortcuts to Depth and Distance
Arrange smaller elements like pebbles and sand at the back to mimic a receding trail. This classic perspective trick works even in a two-inch-wide scenic terrarium. Your eye naturally follows the taper.
Try a simple script: say, “I’ll start with the largest rocks by the glass, then graduate down to sand nearer the center.” This instantly builds a sense of journey and depth in your scene.
Mix textures for highlights—finer mosses or coarser gravel at strategic points. Contrasts guide the eye and keep the scenic terrarium from feeling monotonous. It’s like giving a painting foreground and background layers.
Selecting Materials That Match Scene Scale
Choose natural materials that are in harmony with the plants you’ve picked, like miniature driftwood for bridges and pea gravel for paths. These bring authenticity and blend into micro terrarium ecosystems seamlessly.
When selecting bridge materials, look for thin slices of bark rather than thick twigs. You want something light, easily positioned, and not overpowering in the compact scenic terrarium space.
Keep adhesive use subtle—using clear drying glue lets structural elements hold tight without unsightly blobs. Build up layers slowly, checking the look after each addition to keep scale accurate.
| Feature | Material Option | Pro to Try | What to Watch |
|---|---|---|---|
| Pathways | River pebbles | Natural shape, easy cleaning | Can look bulky if oversized |
| Bridges | Bark slivers | Lightweight, easy to shape | May need support underneath |
| Steps | Sandstone chips | Stackable for dimension | Fragile, easy to break |
| Landings | Mossy clumps | Softens structure edges | Needs regular misting |
| Railings | Fine wire or roots | Bends to shape, natural finish | Wires may rust if exposed |
Choosing Path Layouts for Flow and Function
Establishing clear movement lines—how a path weaves or meanders—sets the tone of your scenic terrarium. This helps you decide where frames or bridges will guide the story visually.
When picking a route, go for curves or zig-zags that make the container’s space look larger. A single straight line rarely adds visual intrigue in micro terrarium ecosystems.
Structural Checklist for Path Placement
For each scenic terrarium, check: Does the path connect key features? Is it proportionate to overall size? Does it avoid crowding delicate plants or hiding tiny details? This ensures balance and dynamic flow.
- Start paths at clear entry points: Position entry stones or gateway mosses by the glass facing the viewer for an accessible look.
- Allow enough space: Maintain at least twice the path width away from fragile plants to prevent accidental damage when adjusting stones or topdressing.
- Vary the shape: Weave curves or switchbacks for visual motion that makes small scenic terrarium spaces feel extensive and layered.
- Balance with symmetry: Anchor the path with something firm—such as a bridge—at the midpoint to guide the scene, but avoid mirroring everything exactly.
- Blend in edges: Use tufts of moss or tiny pebbles to blur the lines between the path and its surroundings, ensuring the scenic terrarium feels organically integrated.
Once your structure is sound, experiment with lighting. Highlight path curves or shine a low light under bridges for extra drama in scenic terrarium scenes. Shadows add an adventurous feel.
Lighting Choices for Mood Enhancement
Hidden micro-LED lights tucked behind a bridge or beneath overhanging moss establish a magical evening glow. This is especially effective for a scenic terrarium with clear glass walls.
- Backlight a bridge: Secure cool-white LEDs directly under bridge timbers to mimic moonlight across your micro terrarium’s water features.
- Spotlight path highlights: Use single warm LEDs beside sweeping curves for subtle shadow and texture contrast, bringing every pebble into focus.
- Avoid colored bulbs near paths: Naturalistic tones maintain believable micro terrarium ecosystems. Reserve color washes for accent plants or distant features only.
- Time your effects: Set LEDs on a timer for dusk-to-dawn cycles, encouraging live moss and promoting a living scenic terrarium rhythm that changes with the light.
- Diffuse with tiny frosted beads: Add a bead lens over lights to soften harshness and prevent bright spots from overwhelming the gentle details of pathways and bridges.
These tricks let you shape lighting uniquely for every new scenic terrarium, adding rich dimension that delights after dark. Fine-tune placement for the best effect as you go.
Securing Stability: Construction Techniques for Micro Terrarium Walkways
Expect some jostling while building or cleaning—anchoring paths and bridges securely keeps your scenic terrarium neat for the long haul. Prioritize stability as you work with these tiny materials.
Fast-drying adhesives and discreet supports go a long way. Test placements gently; if a bridge wobbles, add a pin-thin anchor or brace hidden beneath a tuft of moss for support.
Layering Techniques for Step-Style Paths
Layer coarse gravel with finer sand for a believable, natural track. Firmly press each layer with tweezers or a wooden stick, assuring the surface stays level in your scenic terrarium.
Imagine laying linoleum, where each segment needs to fit snugly. In micro terrarium ecosystems, fit and finish make all the difference—spaces should be neat, not gappy or crowded, for realism.
Step-style paths work best in taller terrariums. If you try this in a wide, shallow bowl, keep steps just a pebble high for easier scaling and visual harmony overall.
Supporting Fragile Bridge Spans
Secure bridges by lacing invisible fishing line between anchor stones at either end, threading through tiny drilled holes if needed for maximum hold. Test by tapping lightly—a strong scenic terrarium bridge shouldn’t budge.
Add tiny strategic drops of waterproof glue at contact points where bark or wood meets anchor stones—less is more to prevent clouding the scene in your micro terrarium ecosystem.
For true permanence, wedge supporting twigs underneath for a hidden brace. All supports should be covered with moss or miniature plants for a seamless, scenic terrarium view.
| Construction Issue | Common Fix | When to Use | Post-Fix Check |
|---|---|---|---|
| Unstable path | Re-level substrate | Any visible slope | Does the path stay put after tweaks? |
| Wiggly bridge | Add anchor pins | When bridge tips during setup | Stability during cleaning and watering |
| Shaky landing | Pack moss under base | If bridge ends sink | No movement under pressure |
| Visible glue | Wipe excess immediately | With clear adhesives | Nearly invisible to casual viewers |
| Unnatural gaps | Infilling with pebbles | After path placement | Blends edges naturally |
Enhancing Pathways with Storytelling Accents and Scenes
Use narrative details in your scenic terrarium—miniature statues, faux signposts, or a resting bench amplify personality. Thoughtful placement turns any micro ecosystem into a scene worth gazing upon daily.
Accents should narrate their own tiny stories. Position a pair of boots at a bridge start, a snail near a fork, or a pebble pile at a junction—each speaks to an imagined journey.
Integrating Scenic Terrarium Path Details
Work details into the scene naturally. An explorer’s hat by the bridge, a pinch of colored gravel as a flowerbed, or a stray fallen leaf blends with plant life and adds whimsy. Story points should feel discovered rather than staged.
Pretend you’re arranging a diorama for a friend who’s peering close. Ask, “Where would someone stop and rest? Which angle would make them smile?” These questions drive intentional scene design.
Leave clues—tiny footprints in the sand or an arch open to interpretation—so viewers can construct their own stories. Scenic terrarium design rewards close attention and gentle surprises at every turn.
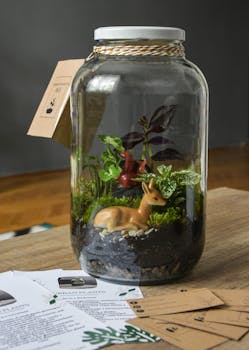
Miniature Wildlife for Lively Ecosystems
Bringing life into micro terrarium ecosystems, add model insects or micro-figurines posed with intent. A ladybug might appear to cross a bridge, or a frog pause by a shady pool. Lifelike positions ignite imagination instantly.
Try the “pause and glance” test. Peer in from above and from eye-level—does wildlife choice enhance the main path, or detract? Save bold colors or abstract shapes for hidden nooks, not the scenic terrarium focal route.
Miniature wildlife needs no adhesive—nestle each in moss or under fronds. Swapping these around lets your scenic terrarium evolve new stories over time without fuss.
Maintaining Visual Clarity and Healthy Growth
Keep scenic terrarium pathways and bridges free of debris to maintain clarity—plant trimmings and dust build up quickly in enclosed spaces. Lightly brush surfaces or gently blow away fallen bits as part of weekly upkeep.
Direct airflow over paths and bridges, not at delicate plants, to prevent disruption of micro terrarium ecosystems. Use a drinking straw for precision in tight spaces.
Care Sequence for Pathways and Bridges
Follow a maintenance loop: inspect, remove visible debris, wipe glass, then mist. If moss creeps onto a pathway, trim gently with angled tweezers and tuck edges back into the substrate for a clean scenic terrarium view.
If path or bridge color dulls, refresh with a toothpick wipe moistened with distilled water. Avoid abrasives, which can scratch glass or dislodge rocks. A gentle approach keeps the micro ecosystem undisturbed.
Once a month, do a deeper check—re-anchor any wobbly bridges, remove mold spots, and replenish lost pebbles. Healthy, clear paths signal that the scenic terrarium is thriving at both macro and micro scales.
Exploring Advanced Combination Features in Micro Terrariums
Layering features—combining a path with a dry streambed or a double-span bridge—offers spectacular results. Select a main accent and keep side elements visually subtle to avoid overwhelming your scenic terrarium space.
Try a sequence: lay path stones, then incorporate a shallow “water” feature using blue gravel. Finish with an arched bridge for a scene that changes with each viewing angle. Change one detail at a time, watching the effect.
Integrating Water Illusions into Pathways
Use clear resin or blue glass beads to forge the illusion of water beneath a bridge. Surround “water” with darker-hued pebbles or driftwood for definition, enhancing the scenic terrarium with gentle ripples or eddy shapes.
Install the bridge only after the resin cures, testing each feature’s stability before moving on. This staged approach prevents loose pieces, ensuring a robust and visually appealing micro terrarium ecosystem with layered depth.
Finish by framing the streambed edge with wispy moss or grass tufts—mirroring a forest setting and making your scenic terrarium look like a shrunken snapshot of nature’s trails.
Designing Dual-Function Pathways
Paths can double as water collectors for thirsty moss or serve as root barriers. Install a slightly concave path, top with fine gravel, and mist sparingly—runoff guides moisture right to roots without soaking delicate bridge features.
This dual-use approach elevates functionality and narrows needed watering schedule. It also helps maintain a distinct path line—plants stay lush but don’t overrun scenic terrarium structure.
To mark boundaries, use a contrasting border, like dark basalt chips for paths and pale stones for bridges. The line remains crisp, and the scenic terrarium retains its artistic definition across seasons.
Elevating Your Scenic Terrarium with Ongoing Creative Adjustments
Maintaining your scenic terrarium is an ongoing creative process. Regular tweaks keep the micro terrarium ecosystem vibrant—switch up path curves, swap in fresh moss, or rotate bridges for a shift in perspective.
Recap your design’s goals monthly. Ask what first inspired you: Was it a winding woodland walk or a fairy-tale bridge? Let that guide minor interventions and new features, keeping your scenic terrarium feeling fresh.
Reinforce the relevancy by noting how these tweaks mirror real landscape evolution. Even the tiniest terrain changes or unexpected moss blooms add depth to micro terrarium ecosystems, making each viewing unique.
Every adjustment—be it a subtle new accent or a repositioned pebble—builds on the initial story. Your scenic terrarium thus remains a living portrait, rewarding both effort and attention.
At the core, the magic of micro terrariums comes from details that surprise and delight. Use your evolving skills to keep each scene engaging—a testament to your creative eye and nature’s endless potential for wonder.
Frequently Asked Questions
What materials are best for building tiny bridges in a micro terrarium?
Choose natural wood slivers or sturdy bark pieces to blend with the planting. Secure with transparent glue and lightweight anchor stones. This ensures stability and keeps the scenic terrarium’s look authentic in any micro ecosystem.
How do I keep scenic terrarium pathways clean and visible?
Regularly sweep debris and prune plants encroaching the path. Use small tweezers for precision. Intentionally placed moss borders help define walkways, making sure your scenic terrarium’s features remain easy to admire over time.
Can I use colored gravel or sand for paths?
Yes, but limit bold colors to accents. Use naturally toned gravel or gently tinted sand for the main pathway to maintain realism in your scenic terrarium. Save brighter shades for focal details, such as miniature flowerbeds or artistically framed corners.
What’s a safe way to add water features under bridges?
Utilize blue glass pebbles or clear craft resin for an illusion of water. Introduce gradually, testing stability after curing. Rely on natural plantings to integrate “water” unobtrusively and avoid unnecessary moisture in your micro terrarium ecosystem.
How can I prevent bridges or paths from shifting after setup?
Anchor structural features using minimal clear glue and hidden fishing line. Confirm placement by gently nudging from above; nothing should wiggle. Add supportive moss to conceal and stabilize, so your scenic terrarium looks well integrated and remains sturdy.