Caring for a micro terrarium ecosystem is a lot like tending to a miniature world. As you settle mosses and tiny ferns, terrarium drainage quietly decides whether your landscape will thrive or falter.
Every healthy micro terrarium depends on a subtle foundation. When substrates are layered with intention and care, excess water exits smoothly, roots get air, and plants grow with steady confidence.
Making the right substrate choices transforms a simple vessel into a lively ecosystem. This guide explores techniques, materials, and checks that keep terrarium drainage fully in your control. Let’s get started on building your micro-terrain!
Selecting Substrates That Guide Water Away from Roots
Effective terrarium drainage begins with smart substrate selection. Choosing layers with varying particle sizes allows water to move down but not pool around delicate roots.
Deciding what goes beneath your plants shapes future care. For example, a layer of lava rock below sphagnum moss gives roots both air and moisture support, while organic soil mixed with sand creates a breathable main bed.
Coarse Drainage Layers: Create Flood Protection First
Lava rock, expanded clay, and river gravel form the bottom stratum for a reason. Their size keeps water from being trapped near roots, reducing the risk of rot.
Think of this layer like the gravel at the base of a fish tank: it catches extra water, but doesn’t let roots drown. You’ll want a substrate depth of about one inch or slightly less in shallow micro terrariums.
After rinsing debris away, sprinkle your chosen coarse substrate evenly across the container base. This is the “safety net” for terrarium drainage, protecting everything above.
Barrier Layers: Stop Soil from Sifting Down
Landscape fabric, fine mesh, or coffee filters work well as separation barriers. They sit directly above the drainage layer, allowing water flow but stopping rich potting soil from seeping downward.
Cut material slightly larger than your container’s base and tuck it in neatly. This step really saves maintenance headaches—no more finger-scooping soil from the rocks during future cleanings.
As water moves through, the barrier prevents messy mixing while keeping terrarium drainage at peak performance.
| Substrate Layer | Main Ingredient | Particle Size | Use-Case Takeaway |
|---|---|---|---|
| Base Drainage | Lava rock or leca | 3-20mm | Prevents root rot by holding excess water below the main bed |
| Barrier | Mesh or filter | N/A | Stops soil from dropping, maintains clean stratification |
| Main Bed | Organic soil, sand | 0.5-2mm | Supports roots, holds moisture and nutrients for plants |
| Capping Top | Sphagnum moss or leaf litter | 2-10cm pieces | Reduces soil splash, adds surface humidity |
| Decorative | Moss or fine stones | Various | Limits evaporation, completes visual design |
Building Up Layers: Step-by-Step Guidance for Micro Terrariums
Arranging each layer with purpose turns a plain jar into a thriving habitat. Follow a sequence that ensures each part complements the last for ideal terrarium drainage.
Start with the right base. “I want a spot for water to escape, not puddle,” you might say as you lay that first rocky bed. This sequence prevents soggy mistakes.
Planning Your Layer Depths
In a three-inch container, use half an inch for drainage, a small barrier, and fill the rest with planting substrate. This limits flooding and keeps the ecosystem light and breathable.
- Add coarse rock first; this promotes movement of water to the bottom, away from roots. Use about 15-20% of your container height.
- Insert the barrier; cut mesh or felt to the container shape. It protects clarifying lines between layers and stops oxygen-drying gaps.
- Pour organic substrate; use a blend of charcoal, sand, and coconut coir or peat for balance. Tamp down gently, not compacting, to preserve porosity.
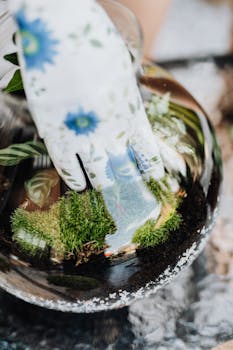
- Finish with a thin topping of sphagnum moss or leaf litter. This prevents soil splash during watering and holds ambient humidity near plant leaves.
- Check vertical spacing between layers visually for evenness and to avoid overflow, which can undermine terrarium drainage and aesthetics both.
Proper planning gives your micro terrarium a framework that keeps drainage reliable and tidy, with each stratum fulfilling a distinct role.
Troubleshooting Layer Problems
Signs of layer failure can sneak up on you: water streaks on container walls, musty smells, or limp moss. These behaviors announce poor drainage, not just aesthetic quirks.
- Re-layer bottom rocks if they appear muddy or saturated; they shouldn’t look black and glistening.
- Swap out the barrier sooner rather than later if you spot soil crumbs below. Over time, cheap fabric disintegrates, causing layers to mix.
- Scoop away old top moss when it yellows. Fresh, clean moss maintains humidity without breaking down into sludge.
- When main soil feels packed, gently loosen it once a month with a chopstick. This introduces air and renews capillary action for drainage.
- Never overfill water above the base layer. An eyedropper gives you precise control and prevents accidental flooding in these tiny micro-ecosystems.
Hands-on, small adjustments like these uphold consistent terrarium drainage and minimize major maintenance needs down the line.
Fine-Tuning Substrate Mixes for Moisture and Airflow
Substrate choices control water flow, root breathability, and growth speed. You’ll see better results by mixing classic ingredients specifically for your micro ecosystem’s humidity and plant needs.
Well-balanced mixes keep the root zone comfortably moist, promote air flow, and aid microbe health—staples for strong, predictable terrarium drainage.
Mix Ratios Based on Plant Types
For moss-dominant terrariums, use more coconut coir and charcoal for constant, gentle moisture. Ferns and tiny begonias prefer two parts soil, one part sand, and a dash of bark chip for minor drainage boosts.
Succulents and arid micro landscapes use up to one-third sand and minimal organic matter—enough to create quick-draining, open root space without trapping water.
If you swap plant species, dial your substrate recipe accordingly. Adjust either moisture absorbers or gritty components for optimal drainage every time.
Case Example: Adjusting for High-Humidity Terrariums
Imagine growing native US mosses in a closed jar. Opt for dense sphagnum, a plug of coir for consistent dampness, topped with a splash of fine charcoal to neutralize odors.
If you spot condensation stuck midway up the glass, blend a few spoonfuls of perlite or additional sand to your next batch. This prevents waterlogging and keeps drainage consistent, while the jar remains lush.
Sudden yellowing at the base signals poor airflow. Gently fork in more sand—don’t let it pile up—and replace the top moss layer every few months.
Checking and Maintaining Layer Integrity Over Time
Layered substrates need a routine eye. Even perfect initial drainage needs maintenance as organic parts and roots decay or shift with watering vibrations.
Inspect at least monthly. “My bottom rocks have turned green,” or “soil reached the glass base” signal attention is overdue; these warning signs can be subtle or abrupt.
Monthly Maintenance Checklist
Lift up your terrarium and view from below. Murky water or soil bleeding into drainage layers means you should redo the bottom bed soon. Fluffy, clean barriers are a positive sign.
If moss collapses or stays wet for days, dry it out with a bit more open airflow or reduce watering. Air pockets forming above substrate layers help break up compaction.
Roots poking through barriers mark healthy downward growth, but replace strands and clips for new separation if they breach the mesh over time.
Tool Routine for Layer Upkeep
Gather bamboo rods, tweezers, and a small brush. Use the rod to gauge soil softness without disturbing plant bases, while the brush removes algae and mineral spots.
Tweezers extract dissolved moss or stray root ends from the barrier and upper drainage layer. Methodically clear blockages every few weeks to keep water slipping easily between substrates.
If roots tangle in the barrier, snip carefully, leaving plenty of length for regrowth. Each routine practice preserves the separation needed for proper terrarium drainage.
Refreshing Top Layers for Longterm Micro-Terrarium Health
Swapping out top layers—like moss, leaf litter, or pebbly mulch—dramatically impacts humidity and prevents disease spread within micro environments, without disturbing roots beneath.
Aim to refresh these every three to six months. New caps trap moisture and halt evaporation spikes, and decorative choices make each mini ecosystem unique.
Checklist: When to Replace Top Layers
Look for yellowing, excessive dryness, or moldy patches across the upper inch. Signs like white fuzz or popping gnats call for a refresh as soon as you notice them.
If leaves or decorative pebbles sink into soggy patches, switching out for new dried leaf, moss, or fine gravel prevents a swamp-like microclimate from forming above your substrata.
Each successful refresh invites cleaner airflow and steadier terrarium drainage—reinforcing healthy plant growth in confined glass spaces.
Choosing Materials for Recapping
Dry sphagnum moss inspires a lush, green effect while holding humidity. Smooth river pebbles suit desert themes, providing a neutral, mineral finish. Use only sanitized, non-muddy materials to reduce pest risks and maintain beauty.
Avoid glossy stones if you notice algae buildup–they can trap excess moisture. Textured gravel and bark help wick away standing droplets, creating balance between visual and functional needs.
Changing up decorative caps reinvigorates your micro ecosystem visually and supports consistent drainage beneath.
Design Tips for Balanced Terrarium Drainage in Small-Scale Ecosystems
A good-looking terrarium is practical too. Design-minded adjustments keep drainage steady, roots intact, and plants healthy from above and below.
Mixing visual and functional choices helps avoid blocking air or letting water pool unseen. Positioning taller plants to one side lets you observe soil and water layers as they evolve.
Avoiding Common Layout Mistakes
Piling soil too high against the glass traps condensation and causes hidden rot. Always slope substrate beds so low points direct excess water toward a visible drainage section.
Skip dense plantings near the drainage zone; open spots let you monitor moisture and intervene early, before issues escalate throughout the whole system.
If you notice roots racing toward the corners, move decorations aside and adjust air flow there, giving each root space to access both air and water without getting congested.
Practical Analogies for Layering Success
Think about substrate layers as building a layered cake. The filling matters just as much as the top: each layer contributes to the whole, and skipping one leaves the dessert lopsided.
Check the “frosting”—your decorative cap—for uniform moisture, not sogginess or dryness. If the topping gets soggy and starts to collapse, add ventilation by opening the lid slightly or thinning the moss.
When you refill water, drizzle it evenly, never pour, to mimic gentle rain. A small syringe or pipette gives the best control for these tiny micro ecosystems.
Wrapping Up: Growing Healthy Micro Terrariums with Expert Drainage
Getting your micro terrarium drainage right means understanding every layer. With thoughtful planning, each substrate works in harmony to keep roots strong, plants vibrant, and maintenance light.
Building, checking, and tweaking these tiny habitats connects you with nature on a miniature scale. Each adjustment teaches you how living systems work and react, right in your hands at home.
Let each experiment with new materials, layouts, and plants further your personal terrarium expertise. Layer by layer, you’ll build confidence and create stunning mini-jungles.
Frequently Asked Questions
What’s the minimum number of substrate layers for proper terrarium drainage?
Include at least three distinct layers: a coarse drainage base, a barrier to separate soil, and a main planting substrate. For added humidity control, finish with a thin top cap like moss or pebbles. Even in the smallest vessels, skipping layers compromises drainage and leads to rot.
How can I prevent my micro terrarium from becoming waterlogged?
Use a precise dropper when watering, never adding so much that the main substrate becomes saturated. If you’re unsure, wait until the top moss dries slightly before rewatering. Consistent observation and conservative watering help avoid standing water at the bottom.
Is it necessary to use activated charcoal in micro terrarium drainage?
Activated charcoal isn’t mandatory but strongly recommended. Its filtering properties absorb odors and chemical buildup. For ultra-small builds, a thin sprinkle mixed into either the base or main substrate layer enhances overall drainage longevity and plant health.
What size of rocks or gravel is best for the base layer?
Choose particles between 3 and 20 mm for micro terrariums. Smaller grains may clog, while larger stones can create uneven air pockets. Rinse before use for cleanliness. This range balances ample water space below and reliable support above for rooting plants.
How do I handle root growth between layers in small containers?
Roots naturally explore and may poke through the barrier. When repotting, untangle and trim gently to keep upper and lower layers defined. Healthy roots can poke through mesh, but watch for flooding or rot if separation fails—adjust materials as your ecosystem evolves.