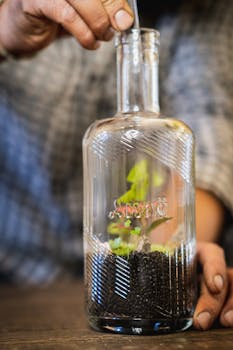
Every micro terrarium ecosystem tells a story in miniature, and adding unique terrarium furniture can spark fresh wonder. Resourceful creators see opportunity in repurposing overlooked items that might otherwise end up as trash. By trimming, stacking, or painting old odds and ends, they craft settings that highlight the rich details of tiny living spaces.
Repurposing objects creates character. Instead of tossing small caps or wayward buttons, some hobbyists transform them into chairs, benches or tiny garden tables for their terrarium furniture. The process blends environmental mindfulness with creativity, enhancing every terrarium landscape without new purchases.
Whether you’re starting your first mossy world or upgrading your current micro ecosystem, exploring recycled possibilities can breathe new life into any build. This guide delivers step-by-step ideas and practical advice for building charming, sustainable terrarium furniture on any scale.
Breathe Life Into Mini Terrariums With Repurposed Furniture Elements
By choosing reclaimed materials, creators instantly increase both visual richness and sustainability. Distinct furniture pieces invite the eye to linger, weaving tiny narratives among the moss, pebbles, and plants.
Little actions yield big results: slowing down to select, clean, and modify common objects brings dimension to your terrarium furniture while minimizing environmental impact. The goal is functional, original, and pleasing results.
Identifying Terrarium Furniture Potential in Recyclables
Scan your recycling bin; many items reveal unexpected possibilities. A plastic bottle cap becomes a footstool. Chopstick segments form modern benches. The secret lies in playful observation and a willingness to adapt, snipping edges or sanding rough patches for a polished miniature result.
When you pick up an object, think of basic furniture forms: cylinder, square, flat surface, or curve. Visualizing simple transformations makes it easier to see terrarium furniture hiding in plain sight. Consider pairing disparate elements to create multi-functional structures.
Maintain a workspace for parts you find intriguing. Store odds and ends in jars, sorted by material or size. Over time, your collection will inspire new terrarium furniture arrangements, with each object sparking its own story.
Adapting Materials for Visual Impact
Contrasting materials—metal, wood, glass, plastic—enliven the miniature ecosystem. Aim for proportion: a bottle cap chair suits micro ferns, while a bamboo skewer bench fits a mossy knoll. Painting plastic transforms texture and adds realism.
Use fine sandpaper to dull plastic shine, or add non-toxic acrylics for a lived-in look. Disguise a colored surface with a layer of earthy brown or soft green. Play with scale by stacking washers or square bits to mimic layered terrain furnishings.
Natural finishes, like oiled wood or stone fragments, echo the terrarium’s living elements and are easy to blend in. Always anchor furniture securely with discreet glue dabs to prevent shifting after placement. Practice patience—one steady hand beats fancy tools.
| Item | Furniture Role | Suitability | Next Step |
|---|---|---|---|
| Bottle Cap | Table, Stool, Footrest | Waterproof, easy to trim | Sand edges, paint top, glue |
| Paper Clip | Chair Frame, Railing | Flexible, easy bend | Bend to shape, tape or glue |
| Chopstick Segment | Bench, Ladder | Wood, cuts clean | Saw, sand, stain for effect |
| Button | Seat, Tabletop, Accent | Varied shape, stackable | Stack, glue or paint |
| Wine Foil | Lamp Shade, Rug | Flexible, metallic look | Flatten, cut, press into place |
Gather and Prepare Recyclables for Clean, Safe Crafting
To build reliable terrarium furniture, start with uncontaminated materials. Wash plastics, peel off adhesives, and dry all pieces thoroughly. This habit prevents mold or decay and preserves the aesthetic of your micro terrarium ecosystem.
Once prepped, group items by shape and size. Categorized recyclables speed up the creative process, letting you visualize various furniture layouts quickly. A tidy workspace fosters more focused, enjoyable building sessions.
Safe Cleaning Tactics for Miniature Building
Use warm, soapy water on plastics and glass, scrubbing residues with an old toothbrush. For metal, rub with a soft cloth and a dab of vinegar, then rinse. Avoid harsh chemicals, as terrarium furniture will share space with living plants and delicate mosses.
- Sort bottle caps, buttons, and similar shapes by diameter before washing. This makes drying and later selection faster and neater.
- Cut away any sharp edges or split plastic before cleaning, to avoid snagging gloves or fingers during soapy rinsing.
- Line up damp pieces on a kitchen towel and let air dry overnight for zero moisture residue, especially for metal and wood.
- Label small bins or trays by material: metal, plastic, wood, glass. You’ll find the right piece instantly later.
- For delicate pieces like foils or thin plastics, pat gently with tissue to avoid denting or tearing while drying.
Well-prepared, dry materials ensure your terrarium furniture lasts, prevents hidden mold, and keeps the ecosystem healthy and visually appealing.
Backing Up with Spare Parts for Easier Builds
Gathering an assortment of extras saves time. Less frustration occurs when small parts break, go missing, or fit awkwardly. Always keep two or more versions of your favorite shapes on hand, so switching role or size is quick and seamless.
- Snip dozens of equal-sized chopstick lengths and keep in a labeled jar for structural elements.
- Reserve metallic twist ties for staging or as backup chair legs.
- Stock pile various button sizes—in doubles—for matched table and chair sets.
- Roll short segments of soft wire for improvised railing or supports.
- Keep foam offcuts for shaping armrests or sofas at a miniature scale with safe scissors.
With backup supply, you’ll adapt instantly whenever inspiration—or a construction problem—strikes, creating inventive terrarium furniture without workflow interruptions.
Join Miniature Parts for Sturdy, Appealing Furniture
Reliable terrarium furniture must survive watering, occasional bumps, and changes in humidity. Prioritize construction methods that stand up to everyday micro-ecosystem care, from steady gluing to thoughtful assembly techniques.
Well-built joints anchor decorations in place, preventing unsightly collapse or floating parts. Taking the time to test each bond or linkage ensures pieces stay attractive and functional during every plant-trimming or watering round.
Matching Adhesives and Fasteners for Micro Builds
Select the mildest, quickest-drying glue appropriate for terrarium furniture. Dabs of white craft adhesive or small amounts of hot glue (applied with a toothpick) create clean, solid bonds on finished surfaces while avoiding sticky overflow onto the moss or glass.
Practice applying less glue than you think is needed—especially on plastic. Pin pieces together until dry. For metal inserts like paper clips or wire frames, use small loops of tape or specific craft glue, letting excess dry fully before adding to your micro ecosystem.
Match adhesives with each material. White glue suits wood, hot melt fits plastic, and superglue handles metal-to-metal connections. Always test on a scrap before assembling your key terrarium furniture pieces. Ensure complete drying before plant reintroduction.
Mini Assembly Line in Action for Consistent Results
Design multiple terrarium furniture pieces at once, such as sets of stools or benches. Use a simple jig—a cardboard slot or block—to guarantee uniform leg alignment. Batched construction ensures symmetry, which looks pleasing inside the micro terrarium ecosystem.
Rotate simple tools: tweezers for placement, toothpicks for adhesive dabs, and a clean, soft brush for removing fluff or dust. These tiny helpers prevent fingerprints and keep each miniature piece pristine during assembly and placement.
After each build step, double-check angles and heights. Briefly pause, then move on only if the furniture stands firm and upright on a hard surface. This habit saves time correcting errors before the glue has cured and before furniture enters the terrarium.
Add Realistic Details for an Authentic Micro-Ecosystem
Final touches turn functional items into showpieces. Sand and finish edges, coat with non-toxic paint, or add faux cushions made from fabric scraps. These details mimic full-sized furnishings and bring an inviting, lived-in atmosphere to the terrarium ecosystem.
Recycled elements have charm, but details set your work apart. Infuse each item with character, then test the effect in situ before full placement. The terrarium furniture should look like it belongs in its world.
Layer Textures on Each Furniture Piece
Add softness using cloth bits as rugs or tiny felt strips as seat covers. Glue pebble fragments on tabletops for stony realism. Sprinkle moss trimmings to simulate cushions or upholstery, and layer for depth. Feel free to experiment—removable details make modifications stress-free.
Treat paints and finishes as finishing touches. Use sponges for brushed effects that echo natural decay or patina. Practice gentle dabbing motions for subtlety. Test on chess pawns or craft scraps before touching actual terrarium furniture.
Try highlighting joints and seams with a faint wash of brown paint, creating a shadowed look like full-sized aged woodwork. These realistic enhancements trick viewers’ eyes and invite closer inspection of your recycled micro masterpieces.
Stage Furniture Placement for Dramatic Mini Landscapes
Position terrarium furniture in high-traffic viewing spots: visible through the glass and adjacent to striking landscape features like moss “lawns” or pebble “streams.” If possible, partially bury legs or bases in the substrate for more natural integration—like real-life garden benches settled in soil.
Frame each piece with complementary foliage. Place a tiny chair beside a low maidenhair fern to evoke a lived-in park bench of a grand scale. For dramatic effect, allow some elements to peek from behind rocks or fallen twigs.
Experiment with angles. Slightly crooked or offset placement often gives more lively, dynamic results than mathematically precise alignment. Your micro terrarium ecosystem benefits from believable stories in every corner—furnish with character, not symmetry.
Blend New and Reclaimed for Bespoke Terrarium Furniture
Combine purchased craft materials with recycled finds for greater customization. Pre-cut wood, miniature wheels, or felt cutouts complement quirky bottle caps or home-collected beads. Together, they form furniture that feels personal and fits each micro terrarium’s theme perfectly.
Let your design be playful. A bead-and-bottle cap table, accompanied by chopstick benches, creates a modern look. A wooden spool seat with bark “cushions” fits woodland themes. Each pairing allows inventiveness and adaptability, no matter your skill level.
Incorporate Natural Materials for Harmony
Scoop up pebbles, twigs, bark, or pinecone pieces while gardening or walking. These natural finds work beautifully with recycled plastics or metals. Blend for a harmonious, eco-inspired effect. Even small accents—like twig armrests or stone inlays—can help your terrarium furniture feel grounded and organic.
Bake or oven-dry twigs at a low temperature for 30 minutes to remove pests or moisture before crafting. Glue sparingly to avoid glossy spots against natural finishes. If desired, brush a bit of non-toxic varnish for longer life in humid conditions.
Practice arranging natural and recycled items side by side before finalizing furniture builds. Test groupings visually, seeking pleasing contrasts. Snap a quick photo for comparison and future reference as your micro ecosystem evolves.
Personalize With Color and Thematic Motifs
Let acrylic marker pens add personality: polka dots, stripes, or foliage-inspired shapes invite fun while harmonizing terrarium furniture with surrounding greenery. Select a single motif (leaf, vine, stone pattern) and repeat across all pieces to unify the miniature scene.
Involve friends in motif-making, letting each person design a signature pattern for your terrarium furniture. The story grows with community input, giving every micro landscape a touch of its creator’s identity. Sign the underside of standout pieces for a hidden signature touch.
Seal final finishes with a light coat of water-based craft sealer if using paints or colored markers. This simple step increases durability and helps colors stand up to plant watering and high humidity. Reapply every few months for fresh, lasting results.
Keep Terrarium Furniture Looking Good in Daily Care
Smart maintenance beats replacement. Dusting with a soft brush every week keeps recycled items and painted details clean, while periodic checks for mold or smudges preserve your terrarium furniture’s lifelike effect.
Monitor humidity; excess moisture can encourage algae or loosen adhesives. Briefly air out the container or use a paper strip to wick condensation, helping mini furnishings last longer.
Monitor and Adjust Placement When Plants Grow
As moss and miniature plants flourish, some terrarium furniture may become hidden or overgrown. Every month, inspect visibility and move pieces as needed. A simple rotation brings forgotten details to the front, refreshing the scene without new builds.
Replace, repair, or repaint if you spot fading, cracking, or color loss. Keep a small kit handy with matching paints and glue for spot fixes. Investing a few minutes preserves the story you’ve crafted within each micro terrarium ecosystem.
Be gentle when moving items. Use tweezers or a soft silicone tool to avoid bumping roots or toppling other decorations. Handle with care and appreciation—consistent, delicate care keeps even the most fragile terrarium furniture looking beautiful for months on end.
Frequently Asked Questions
Can recycled terrarium furniture negatively affect plant health?
Properly cleaned and fully dried recycled items, such as plastics, metals, and glass, pose no risk to micro terrarium ecosystems if adhesives or paints are non-toxic. Always avoid sharp edges and thoroughly remove all food or chemical residues before building.
What’s the best way to attach furniture pieces so they stay put during watering?
Non-toxic white glue works on wood, while hot glue or thin craft adhesives suit plastics and metal. Always wait until glue is fully cured before placing furniture in your micro terrarium ecosystem, and anchor legs slightly beneath the substrate for extra stability.
How do you clean painted or detailed terrarium furniture without ruining the finish?
Dust delicately with a dry, soft brush, such as an unused makeup brush or soft watercolor paintbrush. Avoid using water or chemicals on painted elements. If deeper cleaning is needed, remove the item and gently wipe away grime before returning it to the terrarium.
How do I know what size furniture fits my terrarium?
Start with your largest plant or landscape feature as a reference point, then scale furniture proportions to roughly one-tenth that size. Test placements with temporary pieces before gluing or decorating. If a piece blocks major plant growth, scale it down or reposition as needed.
What are the safest paints or finishes to use on terrarium furniture?
Water-based acrylic paints and craft sealers, when fully dried and cured, are safe for micro terrarium ecosystems. Always run a small test to check for allergic reactions in moss or sensitive plants. Avoid oil-based options, which may off-gas and disrupt plant health over time.