Lush micro landscapes blend land and water in creative ways, and paludarium design sits at the heart of these living, miniature worlds. When you merge aquatic and terrestrial zones, your tiny ecosystem bursts with new life, movement, and texture—much like a vibrant riverbank in early spring.
For hobbyists and nature lovers, paludarium design offers fresh opportunities to combine lush mosses, small ferns, and even miniature waterfalls within a glass-walled terrarium. It’s more than just visual appeal; these designs can mirror the complexity of real wetlands on a micro scale, inviting deeper appreciation for nature’s balance.
This guide dives into actionable techniques and creative combinations for mixing land and water in micro terrarium ecosystems. Dive deeper to find tricks, layout plans, and hands-on examples that bring your paludarium design vision to life, step by step.
Choosing Your Layout Style for Seamless Water-Land Balance
A well-chosen base layout forms the framework for any successful paludarium design. Start with a clear vision of where water and land sections will meet. This shapes every creative choice you’ll make next.
Consider three layout principles: land to one side with water on the other (the riverbank model), a rounded island in water (the atoll model), or interwoven channels (the delta model). Each layout guides different paludarium design possibilities.
Riverbank Model: Structured Simplicity for Beginners
The riverbank model has a clear division—classic for beginners trying paludarium design. Picture a diagonally sloping piece of cork or stone separating moist soil from a shallow water area. Arranging plants becomes much easier when boundaries are visible.
Place shade-loving mosses near the division, and use fine gravel at the water edge. Users who pick this style say, “A crisp boundary keeps cleaning simple.” Start by stacking hardscape at a gentle angle and add soil against it—plants go in last.
Keep the land that’s higher dry and the lower side moist, letting water lap just beneath the substrate. This design feels natural, organized, and easy to maintain for newcomers.
Interwoven Channels: Advanced Layering Dynamics
For more experienced hobbyists, weaving streams or channels through the substrate boosts complexity and movement. Paludarium design with channels mimics wetlands—snaking water areas between mossy banks and rooted plants.
Build up land with small mounds of pebbles or leca balls, then carve winding water paths between them. “I love how the water finds its own route,” says Jackie, a paludarium enthusiast who uses a pipette to test channel depths before adding creatures or delicate plants.
Interwoven channel designs promote microclimates—damp for ferns, drier for succulents. This layered hydration means you can grow more species side by side, producing a living landscape that’s rich and varied.
| Style | Skill Level | Main Plant Types | Best Use Case |
|---|---|---|---|
| Riverbank | Beginner | Moss, Fern | Simple maintenance, classic beauty |
| Atoll Island | Intermediate | Mini Palms, Aquatic Grasses | Focal centerpiece, open water feel |
| Delta Channels | Advanced | Baby Tears, Java Moss | Complex hydration, plant diversity |
| Forest Edge | Intermediate | Miniature Fern, Fittonia | Natural transition, gentle slopes |
| Cliffside | Advanced | Lithops, Moss | Vertical drama, limited space |
Building Strong Foundations That Prevent Land Collapse
Securing the boundaries between water and land is a must in micro paludarium design. A weak foundation leads to substrate slumping and muddy water—a common frustration for beginners.
Use dividers, mesh, or hardscape—such as smooth stones or clay shards—to stabilize land at different heights. This support system acts like the frame of a tiny house, helping each ecological layer stay put over time.
Core Materials for Stability
Dedicate 10 minutes to capping each border with inert, aquarium-safe mesh or plastic grid. Slide these just below the surface and anchor with pebbles. This prevents soil from slipping into water zones and clouding the setup.
- Lay down mesh grids for edge stability. They keep substrate separated and water crystal clear.
- Stack smooth stones vertically to add natural-looking walls where earth meets water.
- Secure hard-scape with aquarium sealant for long-lasting boundaries in elaborate paludarium design builds.
- Build shallow terraces using flat rocks for step-down planting and easy cleaning.
- Embed cork bark for lightweight, mold-resistant retaining walls in compact jars.
A well-built edge stops nutrients from leaching out, which keeps aquatic sections healthier and makes trimming plants much less messy over weeks and months.
Layering Substrate: Gradients for Plant Growth
Alternate two to three layers of substrate in stepped sections. Use gravel for drainage, then soil, topped with moss or leaf litter. This approach mimics riverbanks and forest floors in miniature paludarium design settings.
- Start with clean pebbles for a sturdy drainage layer. This keeps roots from soaking in stagnant water and prevents odor.
- Add nutrient-rich soil where roots need support, away from water. Soil here stays moist but not waterlogged, ideal for ferns and fittonias.
- Spread a thin top layer of live moss to lock in moisture. Moss absorbs water vapor and stops soil from eroding down slopes.
- Use a small brush to gently sweep soil off stones after planting. This keeps divisions neat and showcases hardscape details, making paludarium design crisp and photogenic.
- Finish each zone before moving to the next. This process minimizes cross-contamination and makes troubleshooting easier.
Terraced layers invite root exploration and bidirectional water movement, letting your micro ecosystem become more autonomous over time.
Creating Water Features and Moist Microhabitats
Adding water movement and diverse microhabitats enhances both the look and function of a paludarium design. Even simple features, like a trickle of water over stones, can support a thriving cast of plants and tiny animals.
Small pumps, pipettes, or custom-poured channels set micro streams in motion. These moving features raise ambient humidity, creating ideal conditions for mosses, epiphytes, and semi-aquatic species in your setup.
Mini Waterfall Setup Using Natural Materials
Arrange small, stacked slate pieces along the slope to direct water downward gently, not with force. Tuck mosses and tiny ferns in crevices. Their roots grip stones and absorb splash, keeping leaves lush.
Bury one end of an airline tube below the highest slab. Use a bulb syringe or slow dropper to trickle water through for a soothing cascade effect—no bulky pump required. Watch for beads of water clinging to plant leaves—a healthy sign.
Test water flow after planting by adding a single drop and observing the path. Make micro adjustments using tweezers, shifting rocks or plants until the flow looks natural and controlled.
Splash Zones and Mist Pockets for Sensitive Species
Create pockets where water mists or splashes lightly across surfaces. These areas support mosses, liverworts, and springtails that thrive in high humidity but dislike being fully submerged.
Build micro walls with vertical stones and pile sphagnum moss on the cool, misty side. Set a daily misting schedule—brief, gentle bursts—and check for dry patches. If moss feels crunchy, increase misting or add a mini reservoir nearby.
Adjust airflow by partially covering the terrarium’s lid, which slows evaporation and keeps the atmosphere steady. “My moss bounced back after covering half the opening,” shares Sarah, who runs a tropical paludarium design in a pickle jar.
Adding Aquatic Flora and Terrestrial Plants That Thrive Together
Pairing compatible plants from both water and land is critical to successful paludarium design. Thin-rooted species—like Anubias and baby tears—anchor easily between rocks in shallow water, while fittonias and pileas excel on higher ground.
Begin with a shortlist of plants. Choose those that prefer consistently damp roots, then mix in a couple that handle drier conditions. Always rinse roots to avoid cross-contamination from outside soil or pests.
Quick Checklist: Selecting Micro Flora
- Look for aquatic plants under 3 inches (Anubias nana, Java moss)—these won’t outgrow your micro habitat quickly and stay proportional.
- Prioritize terrestrial plants with small leaves (pilea glauca, fittonia). They add texture without shading out the water section or crowding the glass.
- Avoid rapid climbers and runners. They dominate space fast and clog water portions, so choose slow growers for long-term health.
- Mix heights for a layered effect—baby tears along the edge, moss and micro ferns above. Place taller picks at the rear to create perspective without blocking the view.
- Stick with 2–3 species for your first paludarium design. Larger mixes require advanced pruning, more light, and vigilant pest control.
By starting with compatible, slow-growing plants, you’ll reduce maintenance and let your miniature landscape mature gracefully—one leaf at a time.
Status Checks: Spotting Trouble and Keeping Balance
Weekly maintenance is the secret to keeping micro paludarium design healthy. Observe plant colors, water clarity, and tiny animal activity during each checkup. Take notes on anything that changes from your initial setup.
If you see water clouding, reduce feeding, siphon out debris, and check for trapped soil under stones. Brown leaves mean a humidity dip or poor airflow; mist more or ventilate. Watch for algae blooms—a common issue solved by reducing light exposure for a few days.
Checklist for Regular Inspections
- Check water level every three days. Top up with dechlorinated water—never tap—using a syringe to control flow and avoid substrate disturbance.
- Brush plant leaves gently to remove dust or algae. Clean glass inside and out to enjoy crisp visibility into your paludarium design.
- Inspect for pests like fungus gnats near roots. Catch issues early by using sticky traps or natural predators (springtails) before outbreaks spread.
- Prune overly tall or sprawled plants regularly with scissors. Trim dead foliage to keep circulation flowing and prevent rot in snug glass containers.
- Take quick photos after each maintenance session. Compare over time to track growth and spot subtle issues—a digital log book in your phone helps keep routine checks on track.
Routine care not only extends the lifespan of your ecosystem but also gives you more time to enjoy watching small changes unfold.
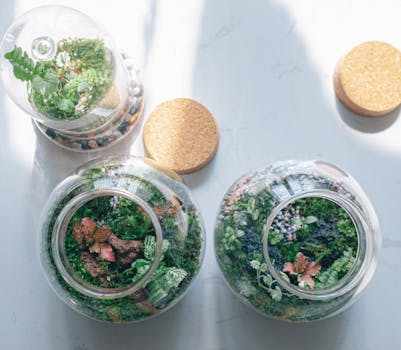
Real-World Example: Step-by-Step 2-Liter Jar Paludarium
Follow this tested process for a 2-liter glass jar to build reliable foundations, add diverse plants, and maintain water clarity in a micro paludarium design for months.
Step-by-step, you’ll see how layering, careful planting, and routine tweaks enable a thriving, balanced landscape—even in a compact vessel.
Preparation and Hardscape Arrangement
Add a 1-inch layer of pebbles, then place a mesh partition. Angle a large piece of cork, creating gentle slope. Pour moist substrate on the land side, tamping gently, and use tweezers to press soil into corners for stability.
Arrange three to five stones to outline the shore. Fill the water area with dechlorinated water, using a pipette to prevent flow onto land. Test boundaries by gently tapping.
Plant tiny aquatic species at the land’s edge (baby tears, anubias). Push moss into crevices above. Snap a quick photo here for reference—this marks your initial balance point.
Planting Routine and Early Maintenance
Place shade-loving plants farthest from the glass to reduce algae. Mist the whole setup immediately, watching for runoff. “I keep my jar near a frosted window for bright, indirect light,” says Alex, whose setup lasted over six months before repotting.
Each week, top off water using a squeeze bottle. Trim any yellowed leaves, and siphon debris with a straw. Routine maintenance lets your paludarium design flourish with stunning clarity and growth.
Add a touch of activated charcoal in the drainage layer if odors appear—it keeps water sweet-smelling and supports tiny invertebrates like springtails and isopods for pest-free balance.
Looking Ahead: Continual Growth in Miniature Ecosystems
The most rewarding aspect of paludarium design is watching your micro terrarium ecosystem change and mature over time. Seasonal adjustments, small plant swaps, or habitat upgrades keep the process challenging and engaging.
Today, you might introduce a new moss patch or swap a pebble to redirect water. Small, steady experimental steps are the best way to refine your design while keeping inhabitants healthy and thriving.
Every living paludarium tells a different story—one visitor might crouch down, eyes wide in wonder, tracing the path of a single droplet across a moss-covered stone. Others notice the interplay of texture, color, and subtle movement throughout the day.
Frequently Asked Questions
- What is the best container size for a beginner small-scale paludarium?
- Start with a glass jar or tank between 1–3 liters. It keeps maintenance simple and lets you observe water-land dynamics closely without getting overwhelmed. Larger setups need advanced planning and more maintenance effort.
- How do you avoid mold growth in paludarium design?
- Increase airflow by opening the lid once a day, mist only when needed, and place isopods or springtails to naturally break down dead plant material. Use clean, rinsed materials to reduce initial mold spores and remove decaying leaves quickly.
- Can I add small animals like shrimp or snails to my micro paludarium?
- You can, but always check if the land and water conditions (temperature, depth, cleanliness) are suitable. Stick to hardy species like cherry shrimp, ramshorn snails, or springtails for the first attempt, and monitor for sudden changes in water clarity or behavior.
- What plants work best for both water and land sections?
- Try Anubias, Java moss, or baby tears for water, and Fittonia, pilea glauca, and mosses for land. All these choices stay compact and balance moisture needs well, making them suitable for mixed environments in paludarium design.
- How frequently should I change the water in a small paludarium?
- For most micro setups, changing about 25% of the water every two weeks is enough if you feed sparingly and remove debris. Top off evaporated water weekly with dechlorinated water to keep salinity and minerals balanced.